


Illustration by Molly Mendoza.
Welcome to Savor the Science! In each Savor the Science, RENDER’s resident chemist, Claire Lower, will explore culinary questions through a scientific lens, perfecting recipes and demystifying techniques. Theories and reactions will be discussed and experiments will be performed; it’s like your high school chemistry class, only edible. Twice a month, Claire will take a scientific concept (such as the acid-base reactions in baking, macerating, or Maillard browning), explain it in a way that would make Bill Nye proud (hopefully), and then provide an edible experiment which allows you to demonstrate your new scientific food knowledge.
Valentine’s Day (or if you prefer, Anna Howard Shaw Day), is just around the corner, and it seems that every food and beverage website is brimming with romantic dessert recipes to tantalize and impress. The recipes range greatly in the required level of expertise, but you can count on the fact that most will feature that one, famous ingredient so firmly associated with February 14th: chocolate.

Many years ago, I set out to impress my Valentine by cooking a fancy dinner at home. I didn’t want dessert to be too heavy (or time consuming), so I decided to make chocolate-dipped strawberries, assuming that nothing could be easier than melting chocolate and dipping fruit in it.
Having never worked with chocolate before — and not bothering to research — I threw some semi-sweet chips in a non-stick pan, plunked it on the stove, and set the heat at medium-low. After about five minutes, the chocolate became dry and unmalleable, and I decided to “loosen it up” again with a splash of milk.
If you have ever worked with chocolate before, you know what happens next. Everything seized and transformed into a dull and grainy mess, forcing me to throw the whole thing out and serve the strawberries with whipped cream instead. (It wasn’t a terrible trade-off, to be honest.)
But why did this happen? Chocolate dipped strawberries should be the easiest thing in the world to make. How can melting and cooling go so wrong? I didn’t know it at the time, but I had committed three of the major crimes one can commit when working with chocolate: I heated it too high. I cooled it too quickly. I introduced water (not pure water, but milk is full of the stuff). Any one of these would have resulted in unusable chocolate, but the three combined made for a particularly gross-looking kitchen disaster.
The fault doesn’t lie in the cocoa, but in the cocoa butter (the fat component that gives chocolate its creamy mouthfeel). According to The Elements of Chocolate (a special science seminar for food scientists by The American Chemical Society), cocoa butter can crystallize in six different forms. The ability to take on these various forms is what makes cocoa butter a polymorph—a substance that can take on many forms. (The phrase derives from “poly,” meaning “many,” and “morphism,” meaning “shape.”)
When you buy a hard, shiny chocolate bar from the store, it’s in Form V. Forms I-IV won’t form the stable crystals necessary for coating berries or truffles, and Form VI only forms in small amounts out of form V after a long, stationary period. Getting chocolate to the shiny and stable Form V is accomplished through a process called tempering, which consists of heating and cooling chocolate to precise temperatures. If chocolate isn’t properly tempered, it may look blotchy and dull, and fat may migrate to the surface and “bloom,” which is manifested by the appearance of white spots or streaks. But even if you do manage to follow the necessary temperature path perfectly, it can all fall apart at the hands of just one drop of water, as water will immediately disrupt cocoa butter’s crystal structure, no matter which form it’s in.
But avoiding water is the easy part—it's the rest requires a little more attention. Unfortunately, our eyes aren’t capable of seeing the crystal structures within cocoa butter, so we have to rely on what we know about how it behaves at various temperatures. High-quality, store bought bars are already tempered and full of stable, Form V crystals. When melting chocolate for strawberry dipping (or other similar activities), the main challenge is getting it into a liquid, workable form without destroying those beautiful crystals.
There are several ways to go about this. J. Kenji Alt-Lopez of the Serious Eats Food Lab tried three different methods utilizing a stovetop (or microwave), hair dryer, and sous vide. Though each method varied in difficulty and outcome, each one relied on careful and precise control over the temperature, heating the chocolate to 115℉ (the temperature at which it melts completely), rapidly cooling to 81℉ (promoting the rapid formation of Form IV and V crystals), and then warming back up so the temperature falls within 88 and 92℉ (the range at which Form V crystals form stably, but Form IV melts).
But not everyone uses the same temperatures in tempering their chocolate. According to Dr. Paul Dimick, the easiest way to do this is to never heat your chocolate above 92℉, as Form V crystals don’t melt until 94℉. Assuming the chocolate bar you’re using was properly tempered before it hit store shelves, you can utilize the preformed Form V crystals to your benefit:
"Your goal is to barely melt the chocolate. All of these crystals have a range over which they melt and chocolate melts at 89° to 90℉ even though all the beta crystals do not melt until above 94℉. You can keep the chocolate over a very low heat source and, with constant stirring, melt 2/3 of it. Then, remove it from the heat and patiently continue stirring until all the chocolate is melted. For dark chocolate, ideally you want to end up with a temperature of 89° to 91℉ (87° to 89℉ for milk or white chocolate). If you have kept the chocolate below 92℉ during all of this, it is still tempered and ready for use."
Though there are varying opinions on exactly what temperature route you should take, almost everyone agrees that a thermometer is vital for any tempering endeavor. It makes sense. If one is attempting a process that relies heavily on temperature control, attempting such without a temperature-measuring device seems doomed for failure.
But what if you could use yourself as a thermometer? Though your skin doesn’t have a temperature readout, it can tell the difference between hot and cold, and variations within the two. Over at The Kitchn, chocolatier Alexandra Whisnant shows us how to utilize the sensitive patch of skin just below our lips as a thermometer, resulting in perfectly-tempered chocolate.
It sounds a little too easy, and I was skeptical at first, but my skepticism is rivaled only by my laziness, so I decided to give Alexandra’s method a try. The whole piece is worth reading, but for easy reference, here’s how she does it:
How To Temper Chocolate Without a Thermometer (from Alexandra Whisnant, via The Kitchn):
What You Need:
Good quality chocolate, between 60-70%
Equipment:
Medium pot for heating water
Metal that will fit snug in the pot
Kitchen towel
Rubber or silicone spatula
Conditions:
A cold room (room temp or below), low humidity—do not attempt before a thunderstorm!
Instructions:
Heat the water: Fill the pot with water and bring it up to a simmer. Turn off the heat.
Begin melting the chocolate: Make sure your bowl is very dry, as any drops of water will seize up the chocolate. Put about 2/3 of your chocolate in the bowl and place it over the water. The water should be touching a large area of the bottom of the bowl. Be very careful that the water does not splash into the bowl. Do not stir! Let the chocolate sit in bowl over the hot water, uncovered, until it is about 2/3 melted.
Stir until completely melted: After the chocolate is about 2/3 melted, gently stir it and allow it to melt further. Letting the chocolate partially melt before stirring prevents creating large clumps of solid chocolate glued together by melted, now re-solidified chocolate. Be very careful not to allow any water into the bowl.
Test the temperature of the chocolate: Lift the spatula up to your lower lip and dab a small dot onto the place just below your lower lip. It should sting slightly (but not too much!).
Add remaining chocolate: Remove the bowl from the water and set it on a folded kitchen towel to absorb any water from the bottom of the bowl. Stir in the remaining chocolate (the 'seed'). Stir slowly and gently until the chocolate is completely melted. The chocolate will begin to thicken and become less shiny and more matte as it cools. This part of the process can take up to half an hour. If you want to speed things up, take the bowl to a cooler place (outside, for example—but not in the rain!).
Test again for temperature: Once all the seed chocolate has melted, touch the spatula to your lower lip area again. The chocolate should feel cooler than your body temperature. If it feels warmer than your skin, you can drop in a few more pieces of chocolate and keep stirring. If you don’t feel anything, this means the chocolate is at about your body temperature, and you need to keep stirring gently until it cools down. When it is ready it will feel refreshing on your skin. You are now ready to dip your ganache!
Keeping the chocolate in temper. Continue to stir the chocolate as you dip. If the chocolate cools too much, turns matte, and begins to thicken, place the bottom of the bowl back into the hot water for 1 or 2 seconds. Remove quickly and stir the warmer chocolate up from the bottom and throughout the bowl. Test to be sure it has not gotten too hot and resume dipping.
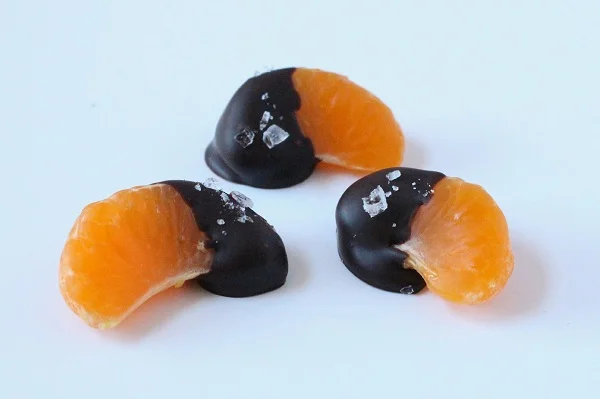
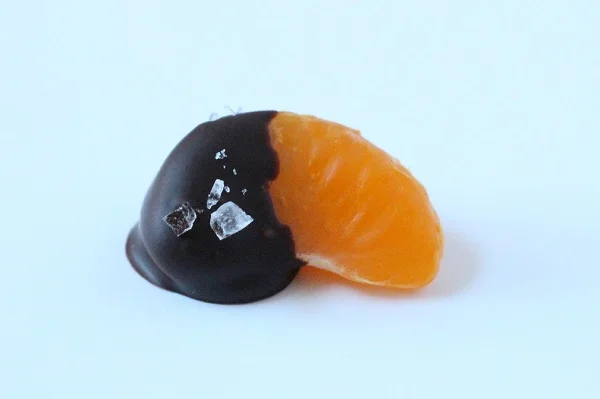
This method worked perfectly, and I wouldn’t change a single thing about this method. Once I realized that tempering was this easy, I began dipping items with wild abandon. There are few things that can't be improved with a coating of dark chocolate, but my current obsession is chocolate-dipped clementines, made just a bit fancy with a sprinkling of sea salt.
Dark Chocolate Dipped Clementines with Sea Salt
Ingredients:
High-Quality Dark Chocolate (between 60-70%)
Clementines
Coarse Sea Salt
Wax Paper
Directions:
Peel the clementines and divide into segments. Remove as many stringy white bits as you can. Blot any excess moisture with a paper towel.
Lay out a sheet of wax paper.
Temper your chocolate using whichever method you’re most comfortable with. (Though I thoroughly recommend the above.) Once the chocolate is properly tempered, dip half of each clementine segment in the chocolate and place on the wax paper to set. Sprinkle with a pinch of salt while wet.